Sunday, April 22, 2012

Spring Time Black Berry Soda

Whoo, this spring has already started to pick up with the start of this new job and my awkward hours. I have barely had any computer time at all. Luckily though it has been almost ninety degrees in my home town, so the weather has been perfect to have a great garage sale. I am so thankful for this, because garage sales mean unearthing precious childhood treasures, and watching them go to other deserving children. Like my golden books. My golden books were my favorite things growing up, any my Mamma sold them to another family. It was sad, but I'm happy that they will be making another kid as happy as I was.

Anyways, a great garage sale drink for super hot weather is Black Berry Soda!

I feel like posting this recipe is sort of ridiculous, because it is so easy to do, but in the spirit of the first truly smouldering days of summer, I'm going to anyways!

What You'll Need

Club Soda
Black Berry syrup
Black Berries
Mint Leaf

Pour club soda into a glass, 'til you hit 3/4 of the way to the top. Next pour in your black berry syrup, stir it all up and done. Wow, that was hard. If you want to make it really complicated like I do, I crush up a few black berries and mix it into the drink as well.

Hardest recipe ever!

Hope you enjoy!

Wednesday, April 18, 2012

DIY- Pool Ball Candles

Let me first start by saying... I am really bad at pool. I suck at it. When I'm playing, I think I'm all good- this pool playing pro- but at the end of the day I'm the worst pool player in the world. So fun, but not my sport. However, I love the feeling of playing pool, because it's such an awesome old school game. I can just imagine folks in these dark Chicago bars in their suits, playing with a cigarette hanging out of their mouths, with this bluesy singer on stage.

I just love the idea, and even more I love the look. Today, I'm going to teach you how to make Pool Balls into nifty candles!

This DIY project is a tricky one, because you've got to be good with the power tools to do it, otherwise.... you should probably lay off. You can also purchase them online if you love them, but are unable to make them yourself.

What You'll Need

1 electric drill
1 forstner bit, 3 inches
A full set of pool balls
The thingy that goes around the pool balls
Tea Lights
Sand Paper

This craft doesn't have many components, it's just the drill that's tricky to use. So start by using the manufacturer's directions, and attaching the forstner bit to the electric drill. Then use the drill to make a 3 inch diameter hole into the center of one of the balls. Be sure that the holes are relatively shallow, because you don't want the balls to split or splinter.

Repeat this on all of the balls, and then make sure to sand down the insides so they look a bit more finished. in the photo above, the rims are painted in a thin gold line, to give them that more polished look.

Carefully fit your tea lights into the balls, and align them in the triangle aligning thingy (I apologize that I don't know pool terminology at all). They make a beautiful center piece, but be sure that no children make the mistake of taking them out and rolling them around when they are lit. For extra child protection, it might even be a wise idea to take a board and glue it on the underside of the project, gluing the balls to it as well, so that it is more child friendly.

And there is a pretty, vintage center piece just for you!

P.S. I know this is supposed to be an earth themed post.... but I got so excited I had to share in advance! Sorry!!!

Tuesday, April 17, 2012

Earthy Hor'devours- Spanakopita

I wish I had more Greek friends, because this earthy treat is one of my favorites and I hardly ever get to eat any. I think my first Spanakopita was in my senior year of highschool. For our senior project we had to research a topic throroughly and then do a demonstration. One of the boys in class decided to do his project on Greece, so luckily he made a huge buffet of Greek food for all of us to try.

From the first bite I was hooked. I love spinach in everything! Spinach and feta cheese in flaky phyllo... I think it's the closest to heaven a food can get!

What You'll Need

2.5 lbs. chopped spinach
1/2 cup chopped parsley
1/2 cup olive oil
1/2 cup freshly chopped dill
1/4 tsp. ground nutmeg
Salt and freshly ground black pepper to taste
1/2 lb. ricotta cheese
1/2 lb. feta cheese, crumbled
4 lightly beaten eggs
1/4 cup butter, melted
1/4 cup olive oil
1 lb. phyllo pastry sheets

To begin, wash and drain the spinach and let it dry. Heat your olive oil in a saute pan, and add the spinach, parsley and dill and sate for about seven minutes, until  your spinach is completely wilted. Add in your nutmeg and salt and pepper to taste. Remove the mix from the heat and put it in a large mixing bowl. In the bowl, combine the eggs, ricotta, and fetta cheese

Mix the melted butter with olive oil in a bowl. Next, grease two 9 x 12 rectangular pans.

Remove the Phyllo roll from its plastic. Almost all packages come with sheets when opened. Cut the sheets in half to make a couple of 9x12 sheets. To keep them from drying, cover one stack with wax paper and a damp paper towl while working with its sister.

Layer 10 sheets on the bottom of the pan, and brush each sheet with the butter and olive oil mix. Add half of the spinach mix evenly in a flat layer. Use a spatula to flatten it down. Then on top of that, layer another 10 phyllo sheets. Repeat the process in the second pan.

Before you put it in the oven, be sure to cut your slices ahead of time, just to make it easier to cut when it comes out. Then bake at 350 until a golden brown. If the pita was frozen when you put it in the oven, it'll take about forty five minutes to cook. If it was fresh, then it will only take about twenty to twenty five.

This is so good! You'll have to freeze one and save it for your friends!

Best snack time Hor'devours ever, and the spinach gives it an earthy taste that is to die for!


Monday, April 16, 2012

Fire Bowl- DIY

Fire is one of the four main elements. It is beautiful, uncontrollable, and symbolizes energy and passion. It can liven up any space, because it works so boldly with neutrals.

Fire bowls are great decorations for your out door tables as you begin to throw garden parties with the approach of summer. They are so cheap, so easy, and so much more exciting than candles. This is a great alternative to candles, or even a fire place, depending on the width and depth of your bowl!

What You'll Need

Flame Resistant Bowl (Ceramic bowls work well)
River Rocks
1 liter of Fire Gel Fuel
Matches

Set up your bowl in an area where there is no danger of fire damage. Clear up anything flammable ahead of time.

Fill the bowl with river rocks- but make sure they are only the kind you get at your local store. River rocks straight out of the river bed tend to have pockets of air and moisture, that will make the rocks crack when heated.

Pour the liter of fire gel over the rocks evenly. About a liter of the gel will burn for a good four hours, so the more liberally you apply it, the longer it will burn.

Light your fire, by tossing a match onto the rocks. This prevents the chance of burns.

If for any reason you want to put your fire bowls out, then just be sure to cover the bowl entirely with another bowl or plate.

Don't Worry

Don't worry, about a thing.
'Cause every little thing,
is gonna be alright!

The past couple of weeks have been so hard on me. I've been out of work for a good eight months, because I left my job right when Christmas hiring finished, so I've been so stressed for money and worrying about financing college that it's been driving me crazy.

A couple weeks ago, I was hired on at In Shape. Called in, filled out the paper work, had my passport scanned and everything. All that was left was my background check, and the front desk manager told me that I would be in to work in less then a week. Unfortunately though, it's been two weeks since the supposed start date, and not a single phone call.

I was really anxious about it, until I ran across this photo.

Weird right?

Well, it just reminded me how even when things seem really bad, there's always a silver lining. For instance, two years ago- in a mood, I decided to cut off my long hair into a faux hawk without thinking about the consequences. For the longest time I had to go through horrible phases of hair awkwardness, and felt unattractive, and sad without my comforting long blankets of hair falling over my shoulders.

However, it wasn't until I accepted that sometimes things go wrong, and complaining and feeling bad about it wasn't going to fix anything- that I began to regain my self confidence and started to rock that short hair like I owned the world. Then, because I found contentment in myself, others began to approach me constantly, asking if I was a hair stylist and where I got my hair done. It was great!

So this just reminded me... You know what, even when things seem hopeless, and you feel anxious, or worried- God has blessed you!

You don't have to worry about anything!

So what if In Shape didn't work out? There are so many other opportunities and I refuse to waste them!

Saturday, April 14, 2012

Sakura Mochi Recipe


In honor of the Japanese Cherry Blossom festival, I'd like to share with you all, the traditional treat- Sakura Mochi. Or Cherry Blossom Mochi. It's perfectly pink and pretty, just like the Japanese flowers. I loved watching people making mochi today at the festival, so I wanted to try my hand at it and make some of my own.

While it wasn't as wonderful as the pro's, I thought they were pretty good... and if anything they certainly looked pretty.

What You'll Need

3/4 cup glutinous rice flour
1/3 cup sugar
1 cup water
3/4 cup red bean paste
2-3 drops of red food coloring
Pickled Sakura leaves

Boil your water in a pan, and mix in the glutinous flour. Cover your pan and let it boil for five minutes. Next, place a wet cloth in a steamer and put the dough on the cloth. Steam the dough for 20 minutes over medium heat and then set aside in a separate bowl. Mash the dough up and mix in your sugar, along with a couple of drops of red food dye diluted in water. Divide the dough into balls and flatten them. Put a little bit of red bean paste on the dough as a nice filling. Then round out the dough by hand. Wrap your pickled sakura leaf around the mochi and you're all done.
Now you have a tasty Japanese treat in keeping with the season of the blooming Cherry Blossoms.

Cherry Blossom Festival

The rain finally cleared up, and just in time too, because the SF Cherry Blossom Festival is in town. My aunt, little brother and I piled in the car and made the drive out, enjoying the sun through the open car windows. I had never been to the Cherry Blossom Festival before, but I have always wanted to go, so I was really excited.

Turned out that it was nothing like I expected. Most street fairs tend to be pretty big, but this one was really really small and packed together. Most of the out door vendors didn't sell Japanese goodies, and we were feeling pretty claustrophobic the whole time. Because it was so small, folks were walking around like sardines, and parking was a nightmare.

But even though the crowds were insane, it was nice to see some of the cherry blossom trees littered around, and people flocking to take photos with them.

It was also really fun to people watch.

Since I live outside of the city, folks in my area tend to all look the same- save for a few black sheep here and there. But most college kids just mull around in sweats and hoodies.

It was refreshing to see some actual style on the streets today. A few women were wearing pants that were sort of similar to harem pants, except they were better tailored and in emerald green and zebra print. Where I'm from, the new spring color palate on pants just looks ghetto. But in the city, these ladies know how to dress it up. They were wearing beautiful billowing blouses and high chunky heels, with their hair coiffed in a professional way.

I was super jealous.

I just love people watching, and that's why I was so excited when I ran into a bunch of lolitas running around the festival. I've always adored lolita street style, and recently sold my own Baby the Stars Shine Bright dress to help bring in a little extra money. These girls were so cute in their pretty dresses.

Another high point of the festival was the freshly made mochi. I was always a bit on the fence about my feelings about mochi. I wasn't quite sure if I liked it or not... until I tasted it fresh. We bought both papaya and lychee mochi, and it was the tastiest thing in the world. It was just fluffy and sweet and so good. I'm probably going to put up a recipe now, just because I have to make it.

Though the festival was a little bit too crowded for me, walking around through the cutesy shops, seeing the pretty lolitas, and eating fresh mochi pretty much made up for it. I don't know if I would go out of my way to come again, I think it's a good experience if you already live in the city, but it's not really worth commuting to.

I hope you all had a lovely Saturday, and that you got some nice fresh air.

Friday, April 13, 2012

DIY: Mail Box Succulent Garden

My Daddy comes up with some of the neatest planter box ideas ever. Since it's still so cold out here, we've really been focusing and filling up our garden with succulents. They're very pretty, colorful, and eye catching, and you can fit a whole bunch of them, in tiny places.

One of my Dad's latest projects was making an old mail box into a planter. This project was relatively easy for him, since he's really good with power tools, so if you are too, this is a cute way to fill up space in your back yard.

Most of the things that we needed for this project we had laying around. Nothing has to be too precise, because it all depends upon the actual mail box that you select, and how you want to present it. We just found a thick wooden plank, that had been sitting around for about a year, waiting to be chopped into fire wood. The base was kind of in the same boat, but my daddy just painted it white. The mail box, he found either at a garage sale, or at the flea market.

What You'll Need

An old mail box
A screw drill (I'm not sure what it's called, I'm not much of a handy man, so forgive me)
White Paint
Soil
Succulents
A long thick slab of wood
A smaller, but thick base

This project is fairly easy, if you've already got things lying around like I did. To secure everything, we just drilled screws into the mail box. We did four going down each side, just to make it extra secure. Then we did the same to the plank and base.

When everything was secured, we painted the base for some contrast and let it dry, before filling our mail box with soil.

Then we arranged our succulents the way that we wanted, and packed them in as well.

Now our planter sits right on the outside of the porch, so it gets plenty of light. These particular plants aren't the kind that can go with no sunlight, so be sure to place them where they get enough in the morning time at the very least.

The planter is a great conversation piece for people who stop in for a visit. So if you make one, be prepared for a whole lot of compliments!


Thursday, April 12, 2012

Hot Homestyle Mac N Cheese

Time for my recipe post of the day.

I ended up staying home from school, because I wasn't feeling well. Tummy ache. Boo... But that gave me the incentive to put up a recipe that always makes me feel better when I'm feeling sick or under the weather. Okay, well soup works really well too, but home style mac n cheese... Now that's a real pick me up!

I'm a pasta freak. I know I just posted a blog about how bad it is that I've been eating so much of it, but I have a long history with pasta. We go way back. And I go even further back with cheese. So I hope you enjoy the labors of my dark pasta relationship, and that your mac n cheese turns out super tasty!

What You'll Need

2 cups shredded sharp cheddar cheese
3 cups milk
1/4 cup butter
8 ounces macaroni (I used the twisty ones, but elbow is the usual)
2 1/2 tablespoons all-purpose flour
1/2 cup bread crumbs
1/2 cup grated Parmesan cheese
2 tablespoons butter


Here we go!

First go ahead and cook the macaroni. There should be directions on the box you got, so just go ahead and follow those. When it's all finished, go ahead and drain it.
At the same time, melt your butter over medium heat in a sauce pan. Next stir in the flower, until you make a roux. Add milk slowly, and make sure you are stirring non stop. Stir in the cheeses next and keep stirring over low heat until everything is melted and nice and thick.
Put your macaroni in a casserole dish and pour the sauce over it, and stir it all up.
Now melt your butter into a skillet and add bread crumbs. Leave them in until browned, and then spread them over the mac and cheese.
Bake everything up for a good thirty minutes at 350 F, and you've got the most delicious home made mac n cheese ever. At least Diggles and I think so.

Cross Country Day Dreams

I am a traveler at heart and a lover of old school Americana- both traits I inherited from my parents.

My father's side is made up of sensible country folk. His mother grew up in the mountains of Canyon, in a little house at the top of a hill, which her mother would hike up and down every day to get their mail. There was a well on their property that provided their water, and black berry bushes that my great grandmother would bake into tart pies. My dad would spend his days there, shooting bb guns at cans, and playing in the creek that ran down around the old school house at the bottom of the hill.

He grew up with the American dream. His father worked at a hardware store and then finished his days working in the church, and my dad played in little league and was a boyscout, while his mother ran a day care center in their home. Now he collects old war memorabilia, and loves to travel the country to find lost family in pursuit of his passion for family genealogy.

My beautiful mother immigrated to the United States from Holland. Her mother and father were both born and raised in Indonesia, but immigrated to Holland following the Dutch Indonesian War. My grandmother left her entire family and boyfriend behind in Indonesia to pursue a new life in Holland, and my grandfather who had always been in love with her, followed after her and eventually won her heart. When they came to the U.S. they were known for going on road trips all the time. They had huge family camping trips, traveled up and down the coast line, and never slowed down.

Traveling is in my blood.

 One of my favorite trips- and the one that I'd most like to replicate- was my cross country venture from California to North Dakota, to a family reunion.

We loaded up our old blue family van, took my beautiful grandmother who was grieving the recent death of my grandfather, and went on our way.

We traveled through Utah, and Idaho, Wyoming...

Everywhere was new and exciting, and we ate in lovely little towny joints, with all of the local flavor that is so entertaining.

Living in California, I forget sometimes how different things are just a couple of states away. People aren't consumed by the hustle and bustle, or rushing off in the morning in huge traffic pile ups to get to the city. They aren't paranoid getting off Bart in surrounding cities, or worried about getting held up in the parking lot, or terrified that their boyfriend is going to get mugged again walking around the lake at their college.

Things are more peaceful, laid back. I remember being asked to repeat myself several times, because I spoke so quickly.


Plus, the world is so beautiful outside of our little boxes.
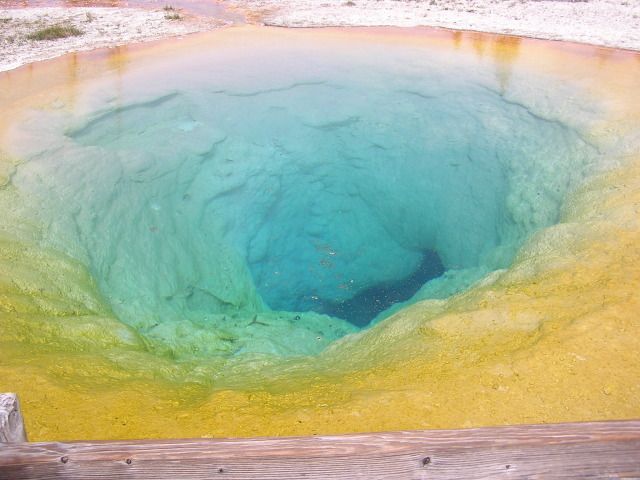
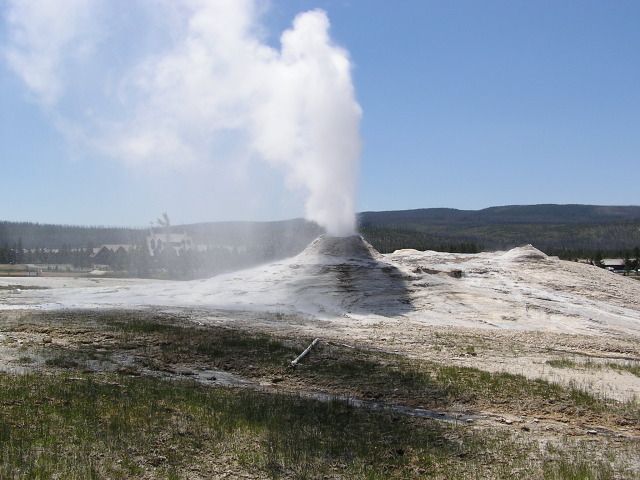
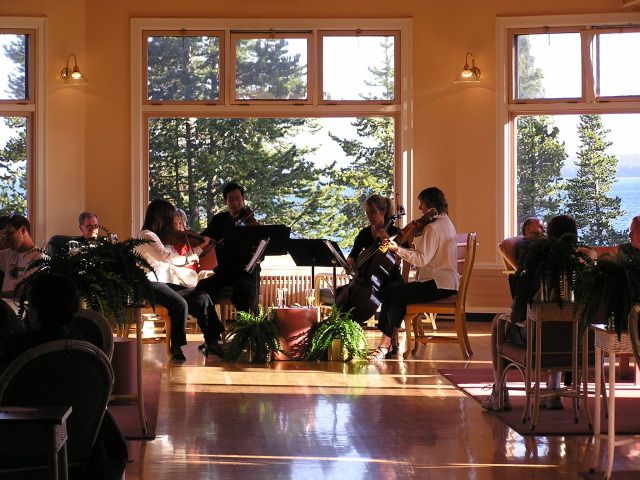
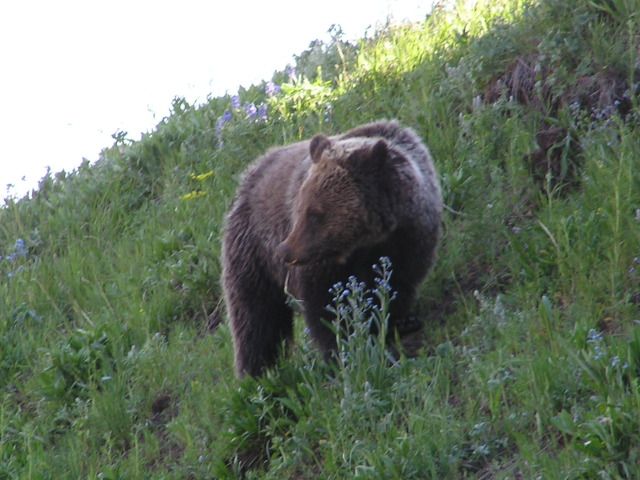
We have to break free of our every day monotony. Hike a little and look at wildlife, explore great geysers, and treat ourselves to pretty hotels with quartets playing in the sunlight of open windows overlooking lovely lakes.

It's so easy to forget to do these things, to let life pass us by and remain boxed in, but I believe that at least once a year, we are called to travel and experience the world and broaden our minds. Meet different people, enjoy kitschy little towns and be funny tourists! Or if you're like my Daddy, then trace back your family line, and hunt down their old historic homes. He found the barn and home of our great great great ancestors!


I've been dreaming about traveling cross country again.

I'll be flying to New York in June, as a late birthday present, but it's not the same as driving through the green fields and being able to get out of the car and take photographs of pretty places. And though my family has also graciously offered me lodging to stay with them for a while in Holland, but for some reason my heart is here in my home land.

There's so much left here to explore!

This summer, it is settled. I must travel!

I will visit as many festivals as I can, see as many town events as possible, and visit every historical land mark that crosses my path.

I would like to follow a similar route, but maybe go a little farther south. There are still a few places I haven't been that I would really like to experience.

For instance, the french quarter of New Orleans, and a few Indian Reservations. Oh, as well as Burning Man. I feel like everyone has to experience it once!

This summer is going to be an absolute blast. I can't stop dreaming about it. Standing on my tip toes with my camera in the summer heat...

Fabulous Folk Art Finds

I love to go to Indie and Antique fairs. I feel like they are one of the best places to draw inspiration from, plus I'm very in love right now with the whole mid western inspired summer look- which means looking for Native American inspired jewelry, feathers, and pretty little odds and ends I can't find in regular stores.

Every once in a while though, I find something that isn't fashion related that I just fall in love with. I found an amazing set of hand crafted dolls by The Cart Before the Horse. These dolls are so unique and have such an interesting appeal. The are just eye catchers. You place them in a boring corner of the house, and suddenly that's all that anyone can talk about, because they are so odd and yet so cute!

The creators of these cute little guys are Dylan and Jo, and you can find them on Etsy. Or you can follow this link to Jo's blog: TheCartBeforeTheHorse.blogspot.com

Check out their adorable creations!


Healthy Breakfasts for Healthy Girls

My worst problem as a new vegetarian, is getting my protein. I find myself eating a lot of starches and a lot of pasta, but there's really nothing too substantial in my diet. So I'm trying to remedy it, by adding more nuts to my diet. Walnuts, Hazelnuts, Almonds... Well pretty much anything that has protein, that I can use to break up the monotony of veggies and a boca burger patty.

Eating healthy is a huge challenge for me. I never had a thick body type growing up, but after college set in, I guess my metabolism decided to collapse. Eating John's Dollar Scoop and Fast food every night, caught up to me, and now I'm boasting a little too much pudge in the pant line. Now don't get me wrong, thick women and thin women are all beautiful, if they're at a healthy weight for their height and frame. I'm just at an unhealthy weight, and not eating well, so it's been a challenge to fix it.

But a yummy bowl of fruit and Kellogs whole wheat cereal in the morning is a tasty healthy alternative... for Captain Crunch and Count Chocula. Now I just do a thin layer of cereal, under as much fruit and nuts I can pack into my bowl. Fresh and good, and filling! Just thinking about it, makes me feel healthier.

Wednesday, April 11, 2012

Cow Girl Cookies for Comfy Tummies


Ever had a Cow Girl Cookie? If not, you ought to!

Diggles and I were sitting in bed, not cleaning, and we were watching Twilight (our go to movie when we're feeling too lazy for our usual brainy psychologicals), when I thought up the idea to go make some. I have absolutely no idea why Twilight always makes me think of cowboys and the mid west- maybe it has something to do with the werewolf tribes- but it does, so I figured, why not make some Cow Girl Cookies.

I remembered this great recipe I learned a while ago from Bakerella, so I figured I ought to visit her site so I could give ya'll the best and truest recipe. She's a baking genius! So be sure to pop on over:  http://www.bakerella.com/mix-things-up/

We may be moving soon, so I decided not only to bake a batch for myself, but to fill up my remaining mason jars with the ingredients, to share with our neighbors. We've been very lucky to have an entire court full of great neighbors who are constantly baking for us, or bringing over fresh corn and vegetables for our chickens. If we do end up moving, it'll be sad to leave, but even sadder if I didn't bring anything over to say thank you with.

Cookie ingredient Jars are the perfect gift. They have everything you need to make great cookies every single time, and they look really cute as decoration too.

What You'll Need

For just making the jar:
 
1-⅓ cup All-purpose Flour
1 teaspoon Baking Powder
1 teaspoon Baking Soda
¼ teaspoons Salt
1 cup Cooking Oats
¾ cups M&Ms®
¾ cups Semi-Sweet Chocolate Chips
½ cups Brown Sugar, Packed
½ cups White Sugar
⅓ cups Chopped Pecans

For baking the cookies yourself:

1 whole Egg, Slightly Beaten
½ cups Butter
1 teaspoon Vanilla

If you're just making the jar, layer everything into it in an attractive way. If you'd like your jar to look exactly like the one featured above then pack in this order: flour (mixed with baking powder, baking soda and salt), oats, M&M’S, chocolate chips, brown sugar, white sugar, followed by chopped pecans! Pack each layer down firmly to make everything fit.

Then seal it up, and make it pretty. Food label tags look really cute, and give you the ability to write out the recipe. If you don't tell the people you're gifting how to bake their cookies, they probably won't turn out all that well! Be sure to tie off your jars with ribbon or other cutesy things to give them personality.

Now on to the baking!


Mix up all of your dry ingredients in a large bowl. Add the wet ingredients and use the back of a large spoon to mix it all together. Don't be shy if it's not mixing well. Go on and get your hands dirty! They are cowgirl cookies after all! When everything's incorporated, roll the cookie dough into 1 1/2 inch balls. And finally, bake for about 10 minutes in a preheated 350 degree oven.

Yummy!

Rainy California Day

It's another rainy California day out here for me. We're looking at thunder storms rolling in tomorrow, so I'm not looking forward to making the drive to school in the rain and bad weather.

Today's just been one of those days. Nothing old or new to report, nothing out of the ordinary. Just average. It's just on these average days that I spend my time anxiously awaiting what the future holds for me.

Last year was crazy. It was full of so much action and drama and adventure. I was deeply in love with someone I had done wrong, I was coping with the loss of a loved one, and I was fixated on trying to get my life back to the place where I wanted it to be. I did so many new and exciting things- went down the American River by tire tube, sky dived, had bonfires on the beach, and went to so many kitschy towny events like the Pumpkin Festival and SF Pillow fight. There was never a dull moment, because there was so much emotion and action!

This year though has been primarily made up of ennui and waiting. I'm not the kind of girl who likes to sit around and wait for things to happen. I'm a go getter, a highly compulsive, dominant personality. So it's been hard to spend my time in this period of... well, waiting. The pond is still so to speak.

While I've been very blessed to be traveling so much, so soon into the year- it's been a little different, because I'm no longer emotionally charged, or because goals are in close reach. I'm no longer in love and pining after something that isn't right for me, I'm not gallivanting after a career right on the horizon. Now that I've switched to teaching, I've got a lot more years of school until I reach my goal. I'm doing all I can to get there... it's just taking time.

Kind of like treading water.

I suppose I'm just impatient.

It's just taking time.

I guess I should be really thankful that for once, I'm in a period of peace. That there aren't any huge tragedies, or family problems, or relationship issues dragging me down. The past four years in general have been crazy for me, so I'm probably not used to the calm.

I will say though, it is nice to be able to relax here and there. Diggles and I are probably going to spend a little while cleaning up my room, watching a romantic movie, and getting some studying done.

I'm going to enjoy the rain from my window. Things may be slow, but they are good.

DIY: Get Toasty With Warm Brown Sugar Coffee Body Scrub

Another of my obsessions is beauty products. I think that web comic Jenna Marbles said it best, when she explained how when we hit that age that we stumble upon how to make face masks in magazines, and soaps from diy tv programs- our minds were just kind of blown.

Concocting little beauty remedies has been a passion of mine, ever since I came upon my first few recipes. I just love to take care of myself, love to smell good, and love the way it feels to spend that little bit of extra time to pamper myself before bed or after a long school day.

Since it's another rainy spring day here in California, I figured that I ought to share with ya'll some warming, delicious diy projects and recipes.

Brown Sugar and Warm Coffee Body scrub is one of my favorites. It is so cheap and easy and smells so good.

What You'll Need

1 cup ground coffee
1 cup brown sugar
1 cup cane sugar
2 teaspoons ground cinnamon
2 teaspoons ground ginger
2 teaspoons ground nutmeg
¾ cup almond oil
Jars to put the scrub in (I used tiny mason jars and gave them away as gifts)

In a bowl, mix in all of the dry ingredients, making sure that you get out all of the clumps. When everything is nice and smooth, just pour in your almond oil and continue to stir until everything has been evenly coated and is nice and moist.

When you're finished, separate into jars.

To use, rub into skin in the shower and let it soak into your skin for about three to five minutes. Not only will it make you smell fantastic, but it will help tighten your skin as well!